Do you want to do voiceovers for your creative videos, podcasts and PowerPoint presentations, but find yourself wondering how to do so? Personally, I use an open source program called Audacity.
In this post, I am going to quickly go over How to Record in Audacity in Audacity. This is an absolutely free program that you can use to perfect your voice over recordings.
The purpose of this article is to give you a quick-start guide to recording your voice in Audacity. In it, you will learn how to start recording, select your microphone, set the correct audio levels, and how to delete unwanted parts of your recording.
In future posts, I will go over what other settings I use after the recording to improve my audio.
Now, lets get started.
What is Audacity?
Audacity in the context we are talking about is a computer program used to edit sound. It is an extremely powerful audio editing program available completely free for use. There will be a link to it at the end of this post for you to download it from.
I used this program to edit my audio for most of my YouTube videos. That said, you can use it for so much more. You could use this program for music production, podcasts, and even a simple voice recording for a presentation as I am doing today.
The first step in making a recording is to open the program and to select your input device.
How to Record in Audacity – Starting Your Recording
The first thing to do when creating a voiceover in Audacity is to choose your microphone. For the purpose of this demonstration, I used the computer’s built in microphone. Usually I use a gamer’s headset that has both built in speakers and a microphone.
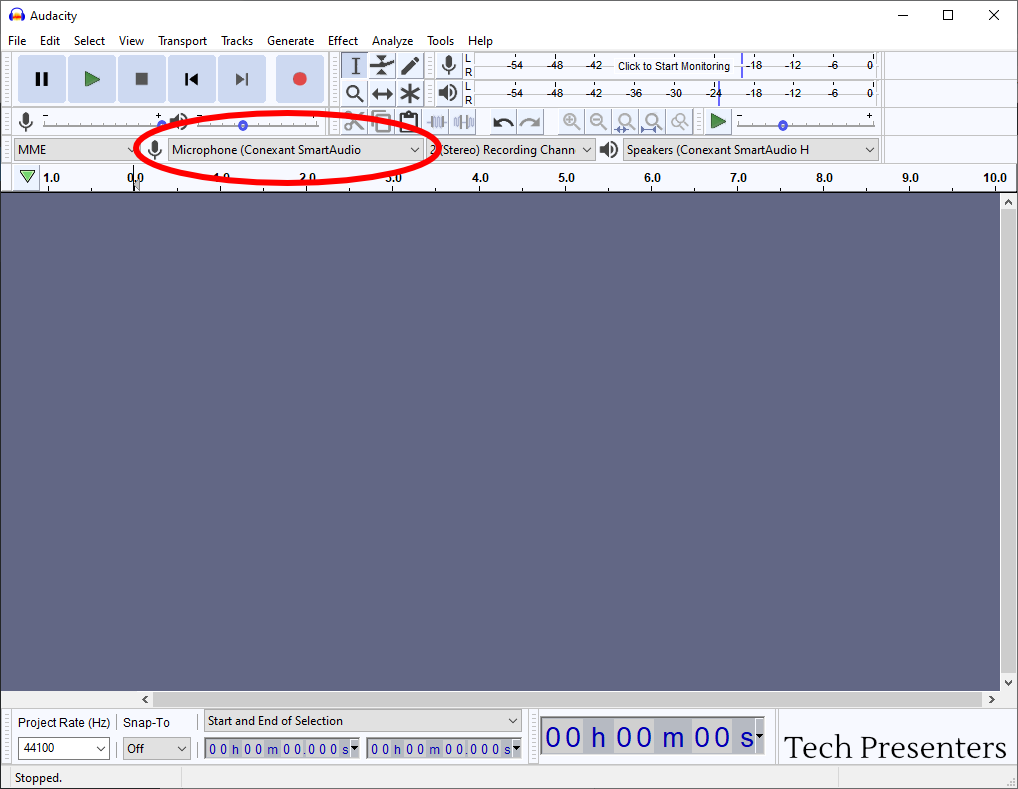
Right above the microphone list is the record button. It is the red circle. When you start recording or click on “Click to Start Monitoring” (over on the top right), you will see your sound levels. You want to keep your loudest sections under “0.” If it goes past that, your audio will be bad. You will hear bad audio in the form of clicks, pops and distortion. We call it “clipping” when the issue is caused by the volume going above zero during the recording.
Changing the input level of your microphone in Audacity is so easy.
How to Record in Audacity – Adjusting your Microphone Input Level
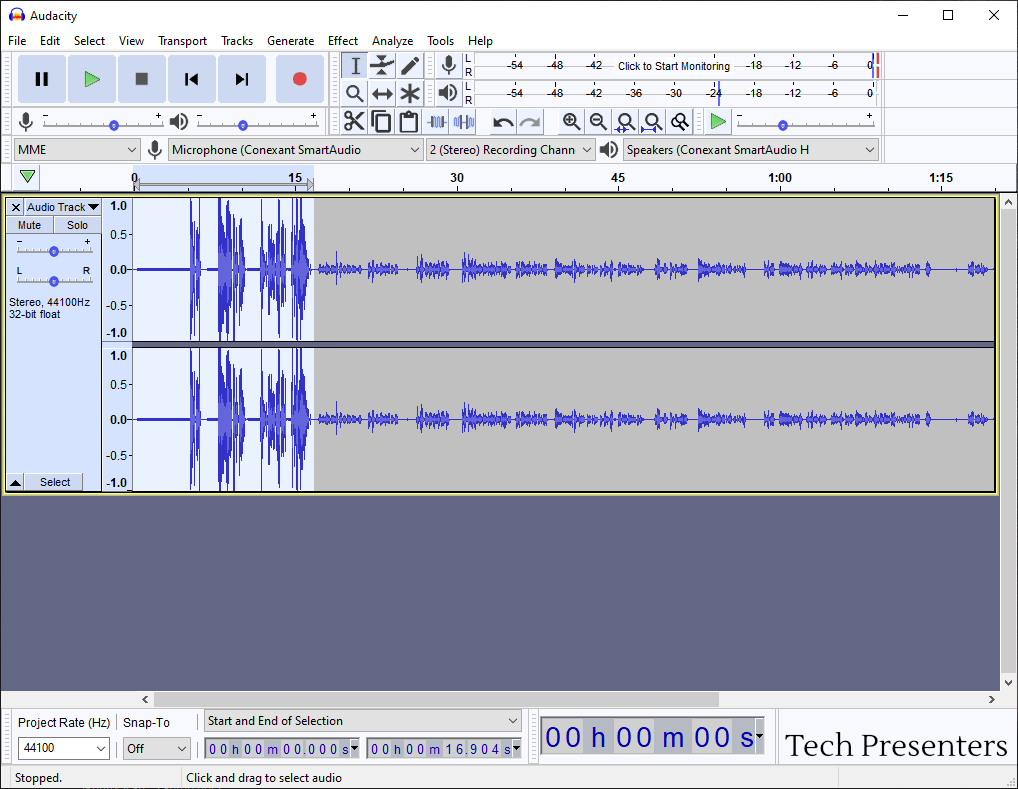
The audio at the start of my recording was too loud. It recorded and distorted in play back. I am going to have to change the input volume so the sound does not clip when I record it.
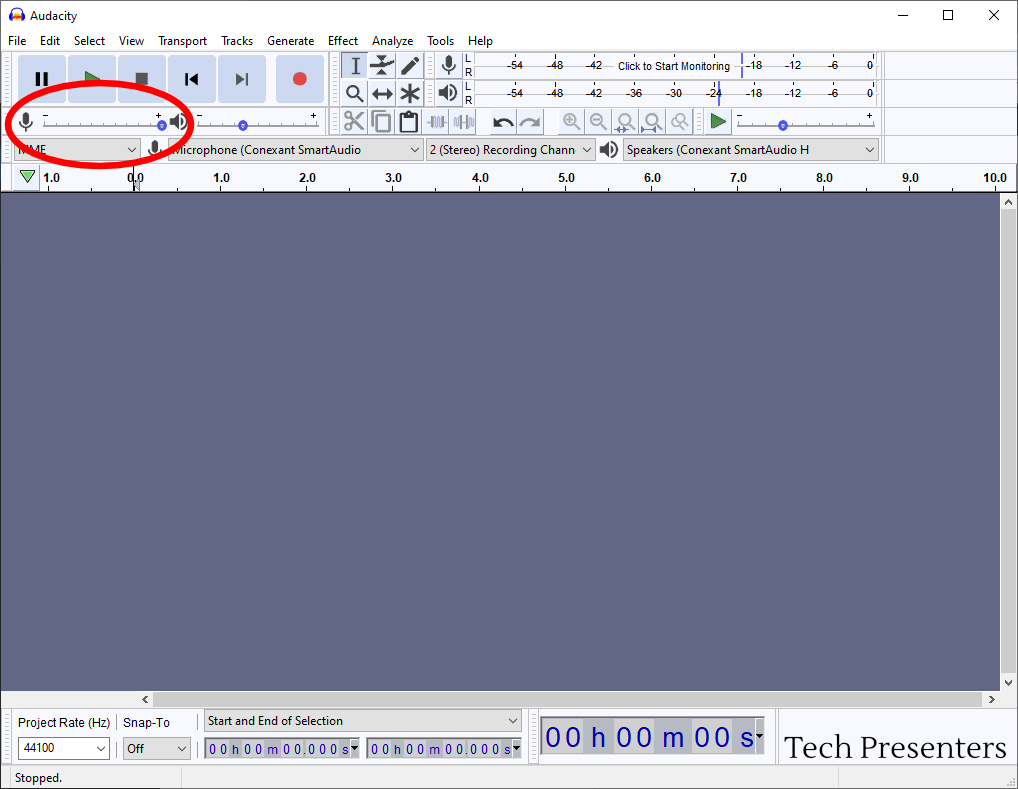
You can fix the input volume with the microphone slider. Just make sure that your loudest levels are under zero. If you come in a little too quiet, we can fix that. I will show you how to do that in another post.
In the picture below, I circled the microphone control slider. You can see it was at maximum before I started the recording. That was too much.
After I started the recording, I slide it down to about 3/4. You can see the new position in the further down images. You want good levels, but it is easier to fix quiet audio than sound that is so loud that it distorts.
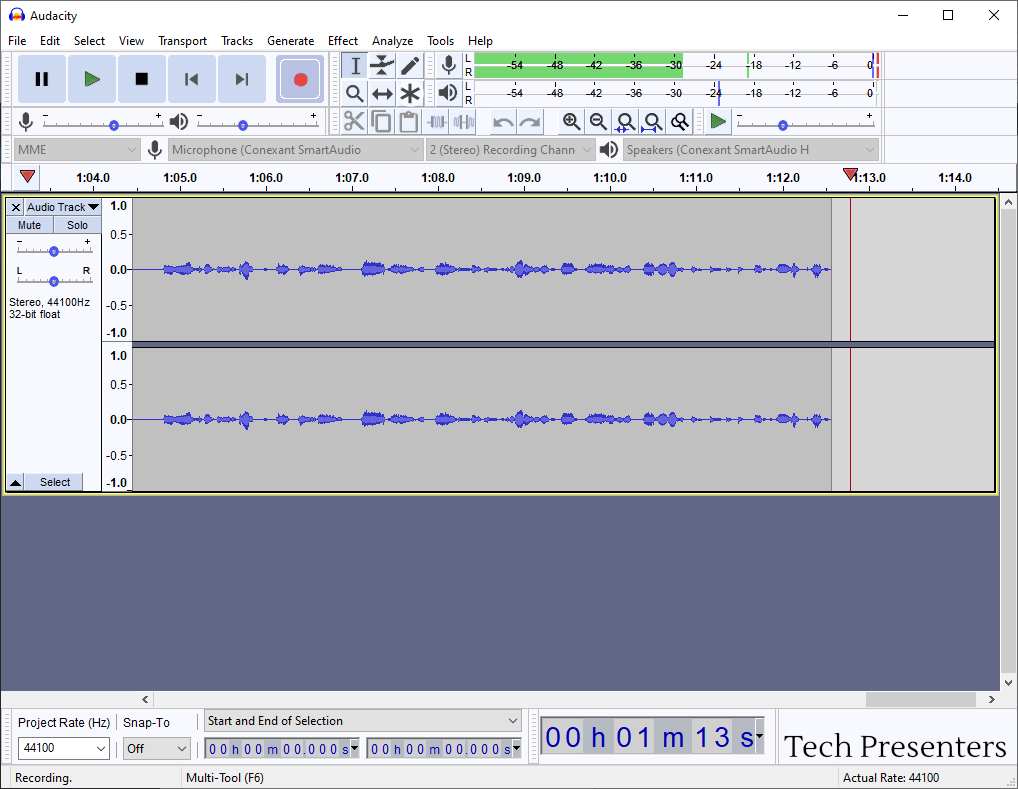
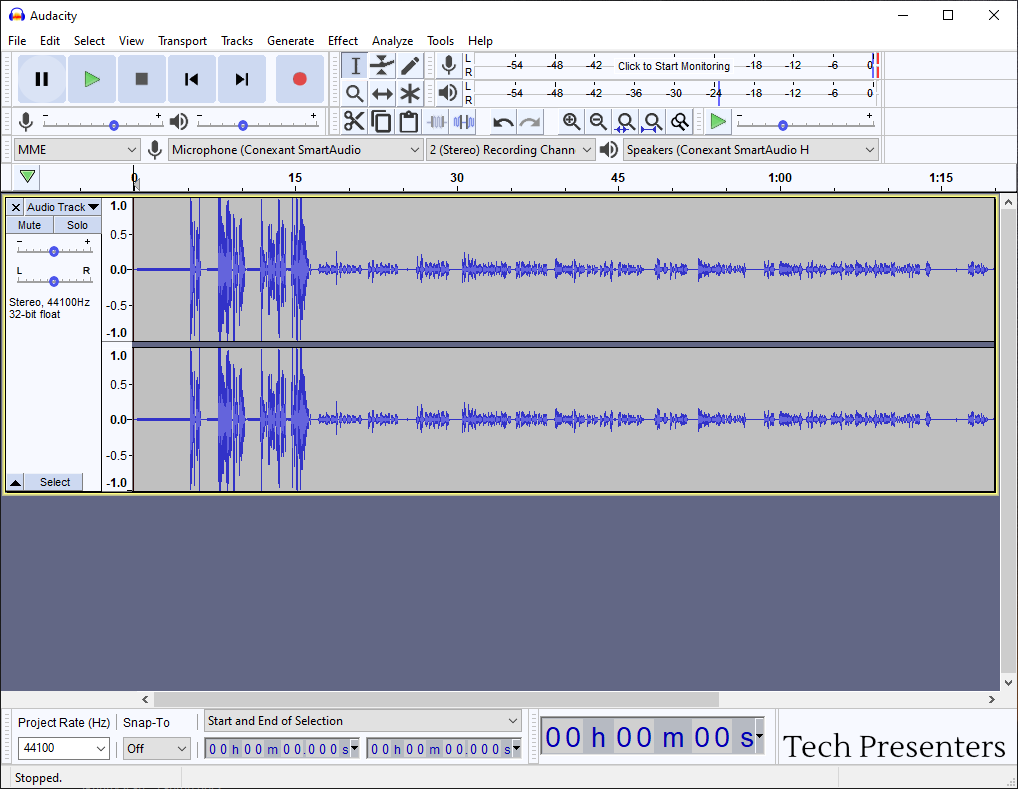
In the image above, you can see my green volume meter for my recording. You want to make sure that never hits 0 or above. As soon as it hits zero, your sound will clip. You don’t want that as the sound becomes unusable. When that happens, it is best to lower your microphone input and to start your recording again (or at least the part that distorted).
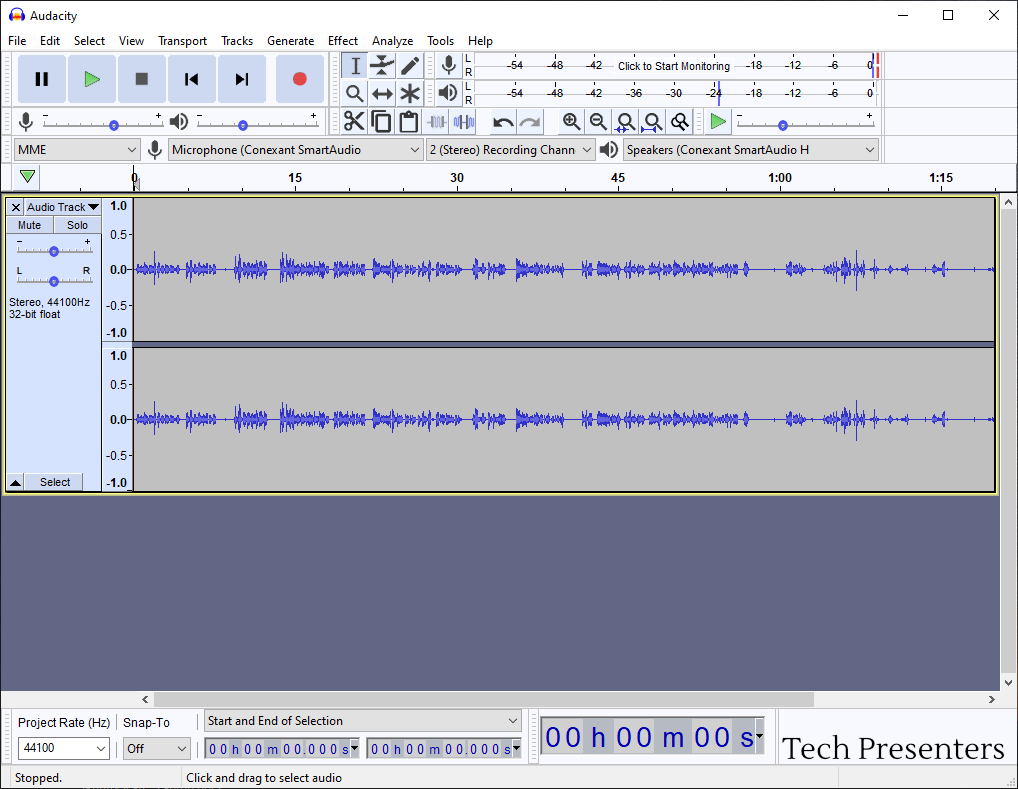
I lowered my microphone input level (audio technicians call that “gain”) and immediately redid that piece of the narration that I messed up. Once complete, I needed to go back and trim off the damaged audio from my recording.
Let’s quickly talk about that how to cut audio in Audacity quickly.
How to Record in Audacity – How to cut unwanted audio
Just as important as knowing how to record in Audacity is knowing how to remove unwanted sections of your recording.
As you noticed above, I have a section of audio that went past the limits. This means that the sound went in past 0 and will result in distortion and clipping during playback. I want to remove this damaged audio. I need to cut that audio out of my recording.
To delete it, I simply highlight the audio and press delete.
As with all things computers, there are multiple ways to do things. The above two steps are the easiest way I find to do my edits in Audacity.
After I fix the obvious error where the audio was too loud, I go through and fix the more subtle things. For this, I delete out any unwanted sounds or pauses in the same fashion. can be tedious, but the end product sounds so much better than leaving in space filler words like “um”, “like” and dead space (sections with too much silence).
Once I am happy with the file, all that is left to do is save it.
Saving and Exporting Your Audio File
I continuously save my project file while I work on it. This project file saves all of the edits that you do to the audio file as you do it. To save your project file, go to “File” then “Save Project” and then “Save Project.” When you do this, it saves your working file so you can keep making your edits.
When you are finished, you need to export the file. To do this, go to “File” then “Export.” Once here, choose the type of file format that you want to export your audio as. After this, you will have a completed file that you can use elsewhere and in other programs.
Relevant Links…
If you haven’t already downloaded Audacity, you can find it here. I encourage you to give it a try. Audacity is a completely free program available for PC, Mac and Linux.
If you are interested in video editors, check out my article “The Best Free Video Editors Out There For the PC.” I edit all of my audio in Audacity and then I take that edited sound into whatever video editing program I happen to be working with.
Recommended Next Articles
After reading this article, I have a few suggested posts for your next read. For this one, the next article that I recommend is How to Remove Background Noise in Audacity.
I also have two round up articles with links to multiple posts that will help you in Audacity. One is meant for beginners and the other is meant for more advanced users. You can get to them with the links above or by clicking on the pictures below.

Now, let’s finish up this article.
Bringing it Together…
Thank you for joining me in this article about how to record in Audacity. Hopefully you learned something. Audacity is extremely powerful for all that it lets you do and it comes completely free.
I edit my sound in this program and then take it over to whatever other program I want. Sometimes that is a video editor, sometimes it is PowerPoint and sometimes it is just as is for an audio player.
Until next time, Happy Presenting Everyone!!!
Audacity® software is copyright © 1999-2021 Audacity Team.
Web site: https://audacityteam.org/. It is free software distributed under the terms of the GNU General Public License.
The name Audacity® is a registered trademark.
I used version 2.4.2 for the screen shots in this post, but the newest version looks and works the same.
Pingback: How to Alter Your Voice in Audacity - Filter Curve - Tech Presenters
Pingback: Improving Your Voiceover in Audacity for Beginners - Tech Presenters
Pingback: The Best Free Video Editors Out there for the PC - Tech Presenters