Ever find yourself wondering how to change slide size in PowerPoint? In this post we are going to quickly go over that.
It happens to all of us. We arrive to a venue expecting one size of screen and end up seeing a different screen than we expected. Maybe the venue has an old 4:3 projection screen in it, or someone else created the PowerPoint deck on a computer with a 4:3 monitor when we want a 16:9 sized presentation. The end result is that we have to change the aspect ratio of our PowerPoint Presentation.
With a little knowledge, you will find this task easy to complete. As with all major changes, I would recommend that you save a back up of your presentation before making the change. This way, you can easily go back to the old file if you make a mistake. Better safe than sorry.
Also, try not to do this right before the presentation starts. You will find that changing the slide size (or aspect ratio) can actually shift around your formatting. After you make this change, I recommend that you go through the deck and make sure you are happy with all of the formatting under the new size.
Before going forward how to change slide size in PowerPoint, I want to let you know that it is far easier to choose the slide size that you want first and then design your PowerPoint file. You still change your slide size in the same way regardless of whether you do it before the design or after, but it is a lot easier before.
While I am working with a Windows computer, the approach you would take for a Mac is the same.
Now, here is what you do…
Quick Tip: How to Change Slide Size in PowerPoint
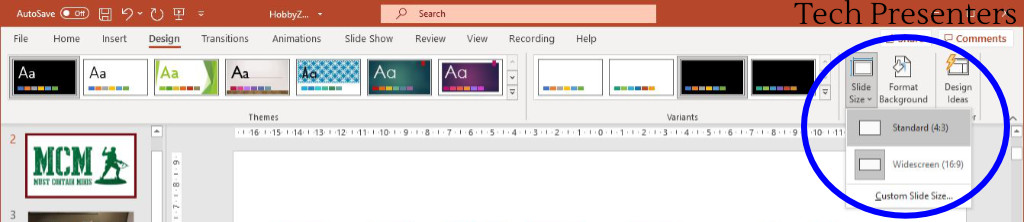
- Go to the “Design” tab.
- Click on “Slide Size”.
- From the drop down menu select whether you want “Standard (4:3)” or “Wide Screen (16:9)”.
After you make the selection, the change will affect every slide in your deck.
If you go from Widescreen (16:9) to Standard (4:3) you will have to decide how you want to resize the screen area. More on that later.
How to Change Slide Size in PowerPoint – with Pictures
So, let’s say I have a 16:9 presentation that I want to change to 4:3 for some reason. The first step is to go to the “Design” tab.

Then I click on “Slide Size” on the far right.
From there, I choose the slide size that I want, and then I am done.
While I saw I am done, in practice, changing the size of the presentation can often affect your layout. You may find yourself wanting to move around objects on every slide to make them look better in the new aspect ratio (slide size).
Which Slide Size to Choose for Microsoft PowerPoint
There are three basic Slide Show sizes to choose from – Standard, Widescreen and Custom.
Standard (4:3)
Choose the “Standard” size of slides for PowerPoint Presentations will be going on a 4:3 monitor. These tend to be older computer monitors, but there are still plenty of them around. These screens tend to look almost square. You will find that these computer monitors are still around and you will also still come across presentations optimized for this side of display.
Widescreen (16:9)
For the most part, this you will want your presentations set up for the “Widescreen” size of slides. This covers most laptop screens, computer monitors and TV sets too. You will also find that 16:10 is a standard size for some computer monitors, but I recommend that you keep your presentations in 16:9.
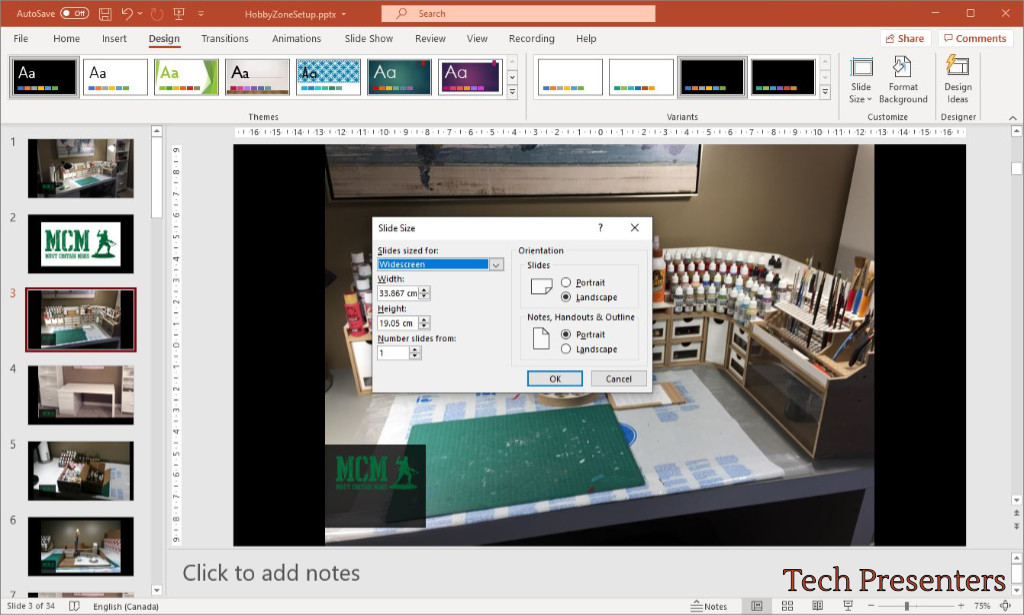
Custom
The “Custom” option for “Side Size” brings up a number of options. You can go with your own values, or use some of the preset ones. You can also change the slides’ orientation to be Portrait or Landscape. If you now your end screen goal for the presentation, you can match it.
A note about changing the Slide Size of a PowerPoint Presentation
Earlier I mentioned that if you go making changes to your slide shows with the Slide Size to make a backup of your presentation. There is a reason for that. This feature will change the layout of your slides. If you change your mind and go back to the original size, often you will find your presentation elements out of place. It is a lot easier to go back to an earlier saved file of your presentation than try to undo the work that you are about to do.
Below I will go through some of the changes you can expect if you change the size of an existing presentation.
How Changing Screen Size Affects your Presentation
The most obvious way that screen size affects your presentation is that it changes your aspect ratio. If you do this change before designing your presentation, that’s all you need to be aware of. If you are doing the changes to an existing presentation, then you need to be aware that the changes will also change your layout of every single slide in the presentation.
Going from 16:9 (Widescreen) to 4:3 (Standard)
As a note, I used PowerPoint for my early YouTube videos. In it, I would use high resolution images and then animations and transitions to move those pictures around. I would use oversize images to achieve this effect. this means that there was more image than slide screen.
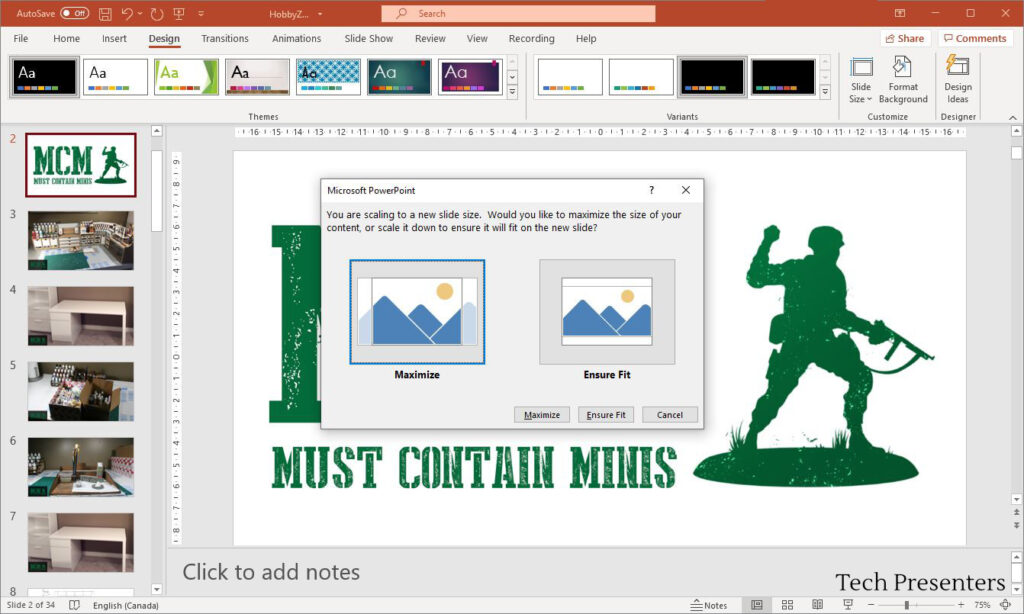
PowerPoint “Widescreen 16:9” to “Standard (4:3)” “Ensure Fit”
When I go to “Standard (4:3)” and “Ensure Fit”, then parts of my oversized images that were not showing before will now be showing.
PowerPoint “Widescreen 16:9” to “Standard (4:3)” “Maximize”
If I click on “Maximize”, the sides of my slides get cut off. Take a look at the left side of the image below
For my purposes, changing the presentation to “Maximize” is not optimal because I designed my slides to use the full 16:9. If I go this route, I would likely want to move my graphical elements after the change to keep them all on the screen. If you designed the 16:9 presentation without making much use of the sides, then you might find “Maximize” more useful.
Now, let’s look at it going the other way.
Going from 4:3 (Standard) to 16:9 (Widescreen)
When you take your PowerPoint slides from 4:3 (Standard) to 16:9 (Widescreen), then the transition can be pretty easy. Take a look at the presentation here.
To fully utilize the 16:9 area, you might want to edit your layouts, but the process of going to 16:9 from 4:3 is not disruptive.
Now, if you are going back and fourth between 4:3 and 16:9, that is where things get interesting. Again, my opinion is that you are better off just saving a new version of your PowerPoint Deck and make changes to that.
My findings are that if you go from a PowerPoint “Widescreen 16:9” to “Standard (4:3)” “Maximize” and back to “Widescreen 16:9” that the PowerPoint Slides end pretty much how they started. That said, if you go from a PowerPoint “Widescreen 16:9” to “Standard (4:3)” “Ensure Fit” and back to “Widescreen 16:9” that the PowerPoint Slides end up a little off. Below is how they end up looking.
As such, my advice remains that if you are going to mess around with the slide size of an existing presentation, save another version (or back up) of it first. Make things easy on yourself in case you want to step things back to where you started.
Bringing it Together…
Thank you for checking out this article about how to change slide size in PowerPoint.
I hope that you found this article helpful. My experience with PowerPoint is both as a support technician and as a hobby. In my hobby work, I use it to make videos. In my professional work, I provide support to those using it for meetings and conferences. Hopefully you can use these tips to make your own work life easier.
For some more tips, check out my article The Hottest PowerPoint HotKeys for Presenters. If you want PowerPoint, but don’t have access to it, check out Microsoft’s website for Microsoft Office 365 (PowerPoint). I am using Office 365 myself.
Until next time, Happy Presenting Everyone!!!


