Welcome to my Video Tips for Webcasts and Online Presentations article.
In my previous post, I discussed my best practices for audio in your webcasts and online presentations. If you want to know more about that, check out the article here.
In this article, I dive deeper into my tips about how to improve your video camera setup for your online presentations and webcasts. At a high level, these tips include…
- Properly use the lighting around you
- Put your camera in a good position
- Remove distractions in you background
- Wear solid colours
Now, let’s dive deeper into each point.
This article is in continuation of my Virtual Best Practices for Webcasts & Presentations series of articles. As a note, the points in this article are meant for a general audience. My advice within will help eliminate some of the common video issues that come with remote presentations. These are Video Tips for webcasts and online presentations.

How To Look Good on Camera – Video Tips for Online Presentations and Webcasts
When it comes to looking good on camera for your webcasts and online presentations, there are a few things to keep in mind. Lighting is of the upmost importance. Even if you have a good setup, poor lighting will wipe out any gains that you make from addressing the other suggestions in this post.
Next up for importance is imaging framing followed by addressing your background and choosing out camera friendly clothing.
So, what simple steps can we do to look good on camera for webcasts and online presentations?

Lighting for a Webcam
Whether you are lighting for a live stream, photography or online presentations, lighting follows the same principals. You want the light source in front of you – not behind you. As a support tech, I see this issue all the time.
If the light comes from behind you, your camera will show you as a silhouette. You need the light to come from in front of you for the camera to properly show the features of your face.
Now, let’s discuss lighting further. Below I give you some lighting suggestions that you might even be able to try for free!
Suggested Lighting Solution
Do you own lamps? You can create a good lighting setup for your webcast using just two lamps that might already be in your house. All you have to do is move them and see how it works out. I anticipate you will see a noticeable improvement.
place two lamps on either side of your camera. Beside or behind the camera should work well. You want the lights to be illuminating your face.
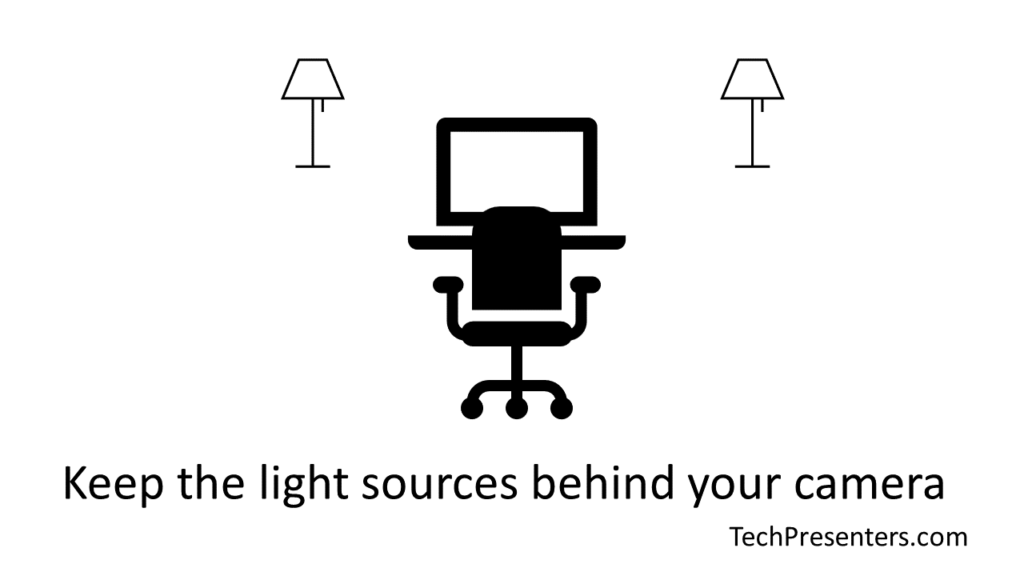
If you don’t have two lamps, one light in the middle of this setup will work too. That said, you will see best results with a lamp on both sides of the workstation. These lamps don’t need to be equal distance. Often you can get some nice results by having one closer to you and the other a little further away.
While I prefer professional lighting equipment, you may very well find that any light source is going to give you good results so long as it is in the right position.
That is why I suggested floor and desk lamps. Ring lights and purpose built lights work very well too. Another light source that works great and costs nothing is the sun!!!
Using a Window to Light Video for Online Presentations and Webcasts
A window works extremely well as a light source for laptop cameras. In fact, a window can often provide better light than lamps.
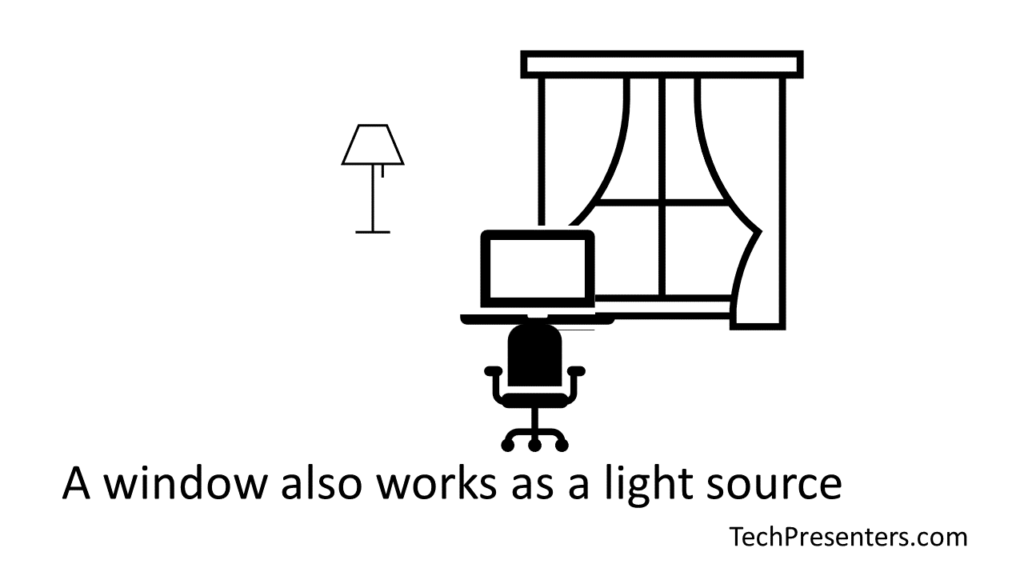
If you use a window for lighting, be sure to also be using daylight temperature bulbs in all of the lamps you use alongside the sun. The reason for this is so that your colours look proper. If the bulbs are not matched the sun by using “daylight temperature bulbs,” you will notice the colours are wrong. This will come across with your image looking either orange or blue in tone.
More About Windows and Webcams
When going on camera, be mindful of windows either to the side of you, or behind you. When using video for online presentations (or video in general), those windows will cause lighting and silhouetting issues. You want those windows either in front of your face or have them covered (by blinds and/or curtains) to reduce any potential negative outcomes resulting from them on your video.
Also, like mentioned above, if you have a window in your room, you might want to consider using daylight temperature lamps. This will give you the best chance of recreating accurate colours on camera.
If you have time, I recommend that you open up your computer’s camera program before the webcast and test it out for the same time as your next online presentation or webcast. This will replicate the lighting level that you should get on the same day as your actual presentation.
Now, let’s talk about how to position your camera.

Positioning Your Camera – Video Tips for Online Presentations and Webcasts
How you frame your video image matters a lot. Again, I recommend that you open the camera program on your laptop to experiment with your setup before your webcast or presentation.
What you would like is an image of yourself centered with your eyes in line with the top third of the image. Below I made a diagram to illustrate this suggestion.
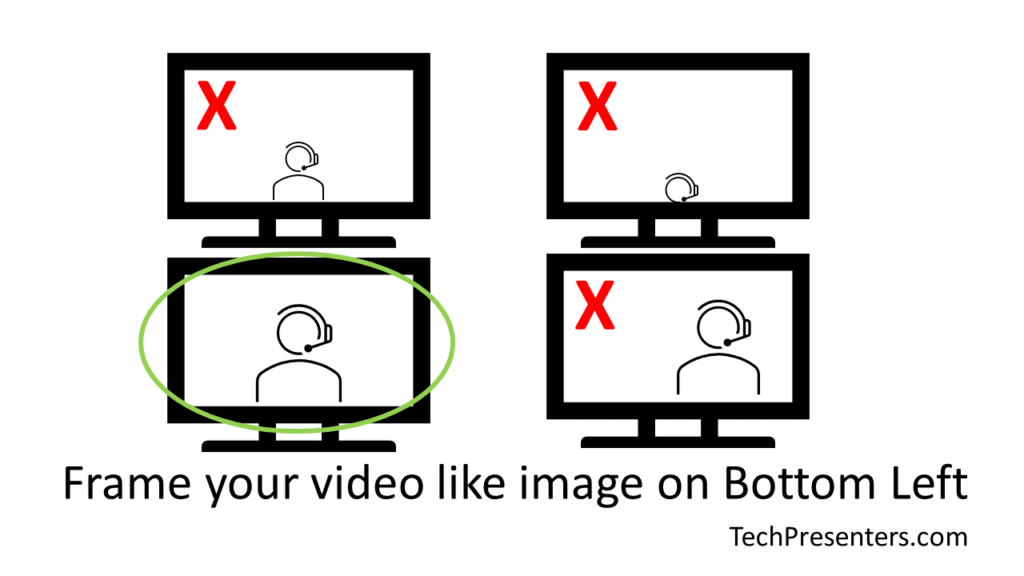
The framing on the bottom left of the above picture will often work best with your video for online presentations and webcasts. When working with a product like Teams or Zoom, you might not be 100% in control of how the program crops the video. Cropping is even more likely when there is more than one video participant.
I’ve seen plenty of times where presenters get cut off because they are not in the center of the screen.
While the image on the bottom right might be most ideal for the photography or videography rule of thirds and image composition, the presenter can sometimes be cut out of the image the audience sees.
You want to use the one on the bottom left – centered and eyes on the top third of the image. If you know for sure that your streaming tool won’t cut you off, feel free to use the framing on the bottom right too.
The two framing methods on the top of the diagram won’t give you technical issues, but they have too much headroom. It looks strange to the audience. It is best to setup your webcam to be something pleasant for those watching your online presentation. Afterall, you want to make a good impression.
Ideally you would like the image to be coming from close to straight on. If your camera is too high, or two low, there are things you can do. We explore that quickly next.
Tips and Tricks for Positioning your Webcam
When it comes to positioning a webcam, there is so much you can do.
Ideally, you want the camera close to your eye height. If you are using an external camera, placing it on the top of your monitor is often good enough. That’s what I do. I also sometimes use a tripod for when I want more control of what the camera sees.
If you are using a webcam that comes built in on a laptop though, you may have to get a little creative. I’ve seen books (and even a chair on top of a dinner table) used to good effect to raise a laptop to eye level. Whatever you use, make sure that what you do is safe. You don’t want your laptop toppling over or placing anything under your laptop that could cause it to overheat.
However you do it, getting the camera up to eye height really helps with your appearance to the audience.
Now that you are set up, let’s talk a bit about your background.

Make Sure Your Background is Free of Distraction and Movement
Think of your space as a stage. Sure, Teams and Zoom have virtual backgrounds, but those backgrounds are not as good as the real thing. What sort of impression do you want to give to the attendees? Virtual backgrounds have their issues. Often they appear fake and often have problems cropping out the presenter well. Having a clean and uncluttered background will help you come across better to your audience.
A simple background can also be easier on your bandwidth, which is important to online presentations. Motion in one’s background often has more of an effect on the quality of video than what people expect.
You have no control over the internet connections of your remote participants. Video that requires less bandwidth helps with the delivery of the stream to the end users. If there is a lot of movement in your background, then the sent video stream is usually larger. If some of that information doesn’t reach your audience, they will see pixilation in the area of the motion.
When you make sure there is no unnecessary movement in your background, then your video has a better chance of arriving clear and crisp to your end audience.
Eliminating that distraction of motion will help your audience focus more on you and also help keep your video smooth.

Wear Clothes Without Complex Patterns
Okay, this tip is a bit of a strange and straight forward one. Cameras like solid colours. If you were clothes that have small and intricate patterns then that pattern might “Shimmer” on camera. This is called the Moiré Effect. You can learn more about that on Wikipedia.
Feel free to test out your clothes with your camera program before the day of your presentation. This will give you a good idea of how the shirt will look for your online event. What looks good to the eye, does not always look good to the camera. Another consideration is that sometimes white messes with the colour balance of a camera, so you might want to avoid wearing white.
Testing out your wardrobe a head of time will help you avoid the Moiré Effect and other potential issues related to your choice of clothing.
Now, let’s bring this Tech Presenters article home.
Point Form Takeaways
Below is a quick summary of the video tips in this article.
- Use light that is in front of you. Avoid using lights above or behind you.
- Make sure to position your camera so you look good.
- Make sure your background is free of distraction and movement.
- Wear clothes without complex patterns. Solid colours are best. Avoid wearing white.
Related Articles…
For more online meeting, presentation and webcast tips, I highly suggest that you go back and check my other stories in this Tech Presenters series of articles. Below is a quick list of those articles.
- Virtual Best Practices for Webcasts & Presentations
- Pre-Event Tips for Webcasts and Online Presentations
- Audio Tips for Webcasts and Online Presentations
- Video Tips for Webcasts and Online Presentations (this article)
- Presentation Tips for Webcasts and Online Meetings
- Final Tips for Online Meetings and Presentations
Now that you have all the resources you need, let’s wrap up this article.
Bringing it Together…
Presenting on video adds an extra element of consideration to your presentations. In this post, we went over my top tips to easily improve your camera image for your webcasts or online presentations. No matter if you are using Teams, Zoom, or something else, setting up your camera better will help with the impression you give to your audience.
Proper lighting is usually the easiest and quickest way to improve the quality of your video. Wearing solid colours and having a background free of distraction will help with bandwidth and the appearance of your “stage.” Finally, getting your camera in a good position will help mimic the eye contact that we miss online versus our in person meetings.
For more online presentation and webcast tips, check out my quick summary article about Best Practices for Online Presentations. These are general articles so you can apply these tips to any online presentation or webcast program. This includes Microsoft Teams, Zoom, and whatever other online conference programs you use. I even use these tips for my family chats through Facebook.
Until next time, Happy Presenting Everyone!!!


Pingback: Virtual Best Practices for Webcasts & Presentations - Tech Presenters