Now that you edited your voice over and reduced the background noise of your audio project, how do you maximize the volume of your recording?
In this post, I tell you how to boost the overall volume of your recording using a program called Audacity. Exactly to what level you want to boost your audio to depends on your end application. I will give you a quick guideline to aim at further down in this post. To do this, we will use an effect called “Normalize”. Normalizing your audio will change your entire selection of audio by the same increase or decrease in decibels.
You can use this to maximize the volume of your your recording, but you can use this same effect to boost (or reduce) the loudness of just small sections of your recording too.
For those who don’t know, Audacity is a free open source audio editing program that also happens to be very powerful. There is a link to them at the very end of the article.
Now, let’s quickly talk about the process of normalizing audio in Audacity.
What does Normalize do in Audacity?
When you normalize audio in Audacity, you take the peak volume levels and adjusting them to the decibel level that you specify. The program will actually go through and apply the change to your entire section
The rest of them audio also increases by the same amount.
Maximize the Volume of your Recording
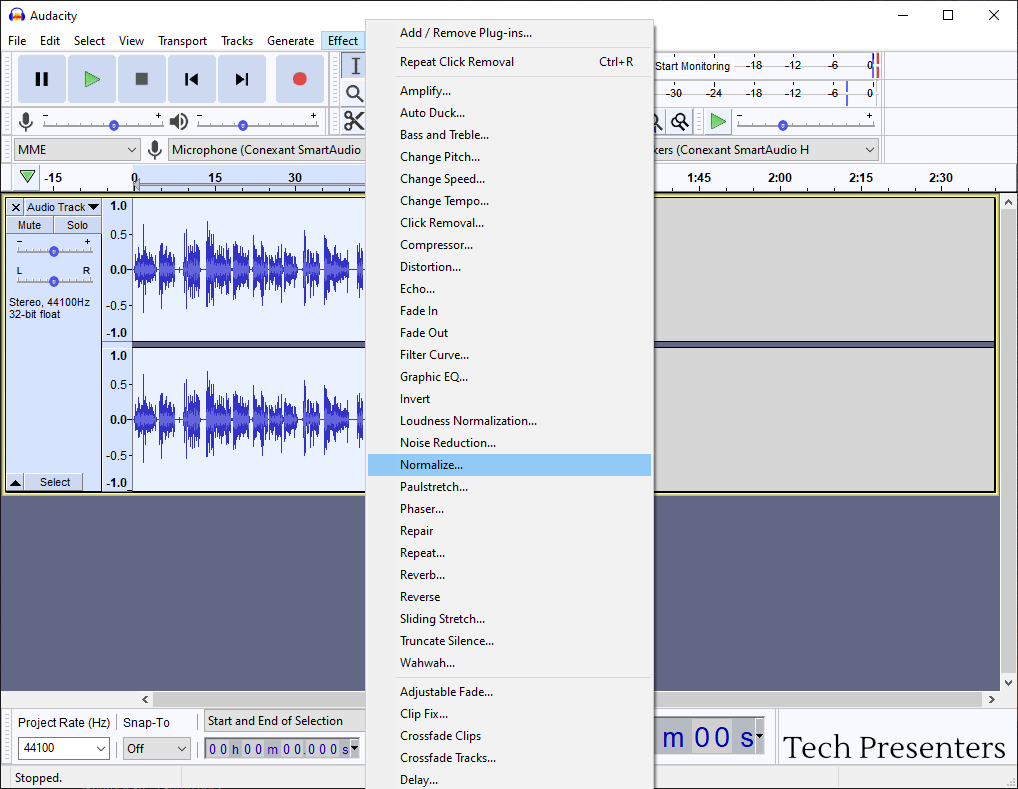
I use this effect all the time in my audio to maximize the loudness of my finished product. To use it, select your audio. I select the entire clip for this. Then go to “Effect” followed by “Normalize”.
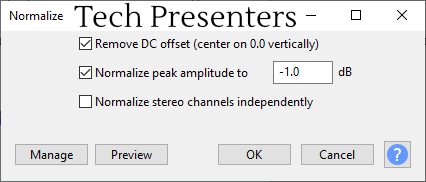
When I change the peak amplitude, Audacity takes my loudest point and raises that up to -1.0 dB. It then raises the volume of the rest of the selected audio to match. This is a great way to maximize the volume of your piece.
Remember, as we learned in my how to record in Audacity post, digital sound clips whenever it hits 0 dB, so -1 dB is a great value to enter into this effect.
Now, the end goal for my recordings is generally YouTube. As such, setting the Normalize Peak Amplitude Value to -1dB really works for my situation. For other applications of your sound, you might want to choose other values. Below is a quick list to consider.
Other Normalize Peak Amplitude Values – Maximize the Volume of your Recording
Setting your Normalize Value to 0 is not always desirable. If you have a specific client or application for your audio, you can save some time by asking the person you are sending the file to if they want it set to any specific loudness.
Other values to consider include…
| Value Range | Application |
|---|---|
| -10 to -20 dB | Broadcast – check with whom you are supplying the file |
| -10dB | Recording for Music |
| -1dB | YouTube or Web Destinations that do not Normalize your Audio |
| -1 to -20dB | Live Presentations – The main thing is to make sure that all of your sources are a consistent as possible |
Now I am going to quickly talk about some other uses for the normalize feature.
The chart above is a guideline and not an absolute rule. Different people may want the file normalized to different values.
Other Applications of Normalize
Changing the Volume of Small Sections of the Clip
Before Normalizing the complete file, you can use Normalize to help balance out the audio of your project better.
You can also use this effect to change the volume of sections to raise or lower parts of your clip to match the rest of the audio. Want to make the selection quieter, try a different value like -13.0 or whatever you find works. If you don’t like the result, you can undo it by pressing the “ctrl” key on your keyboard with “z”. You can also get the undo feature under the “Edit” menu.
I do this to rebalance sections where I spoke a little too loudly (or softly) versus the rest of the file.
Reducing Volume Variation within PowerPoint
Another way that I sometimes use the Normalize feature in Audacity is to bring all of my PowerPoint sound clips up to the same volume. PowerPoint has a volume adjustment feature for sound clips. If you use that, it will help, but you are going by ear. If you take the clips into audacity, you can Normalize them all to the same level (or within the same ballpark) and then export them. Then used those exported clips in PowerPoint.
This will reduce the problem that some people have of extremely loud and extremely quiet clips.
Recommended Next Articles
After reading this article, I have a few suggested posts for your next read. For this one, the next article that I recommend is How to Alter Your Voice in Audacity using the Filter Curve Effect.
I also have two round up articles with links to multiple posts that will help you in Audacity. One is meant for beginners and the other is meant for more advanced users. You can get to them with the links above or by clicking on the pictures below.

Now, let’s finish up this article.
Bringing it Together…
Thank you for joining me in this post about Normalizing sound in Audacity. Hopefully you were able to learn something or find some information that can help you in your own creations.
I use this Effect for every single recording that I do. Right now, I mostly use it change small sections where I felt my voice was too loud or quiet and I use it to finish up the piece and bring it to -1dB for my YouTube clips.
As with all my Audacity posts, there is a link to the Audacity Website just below here.
Until next time, Happy Presenting Everyone!!!
Audacity® software is copyright © 1999-2021 Audacity Team.
Web site: https://audacityteam.org/. It is free software distributed under the terms of the GNU General Public License.
The name Audacity® is a registered trademark.
I used version 2.4.2 for the screen shots in this post, but the newest version looks and works the same.

